The sting of chlorine hangs heavy in the bathroom air, settling tight in the back of your throat like a winter chill. You are kneeling on a damp bath mat, knuckles raw, gripping a plastic bristle brush that has seen better days. You have been scrubbing the shower corners for twenty minutes, yet the shadow trapped deep in the grout lines refuses to budge.
You were taught that cleaning requires aggression and punishment. The standard routine dictates that you spray the loudest, harshest chemical—usually a neon-colored bleach derivative—and put your shoulder into the work until your arms ache. But when you misunderstand the physical nature of the enemy you are fighting, brute force always loses to simple chemistry.
That stubborn gray film clinging to the porous lines between your shower tiles is not regular dirt. It is a complex, hardened layer of human body oils, shed skin cells, and the fatty acids found in everyday bar soap. It has formed a biological concrete, and you have been trying to wash away a solid wall of fat with a liquid acid.
When you step back and look at the molecular reality of a bathroom, the traditional industry standard of cleaning is deeply flawed. The blinding white sprays do not dissolve the barrier; they merely bleach the top layer, turning the dirt translucent while the structural grime remains perfectly intact waiting to trap tomorrow’s dirt.
The Acid Myth and the Surfactant Reality
Think of a cast-iron frying pan left on the stove after cooking bacon. You would never pour bathroom bleach onto congealed cooking grease and expect it to rinse away cleanly. You know intuitively that heavy grease requires something to break the lipid barrier—something that physically grabs onto the oil molecules and forces them to let go of the metal so they can be suspended in water.
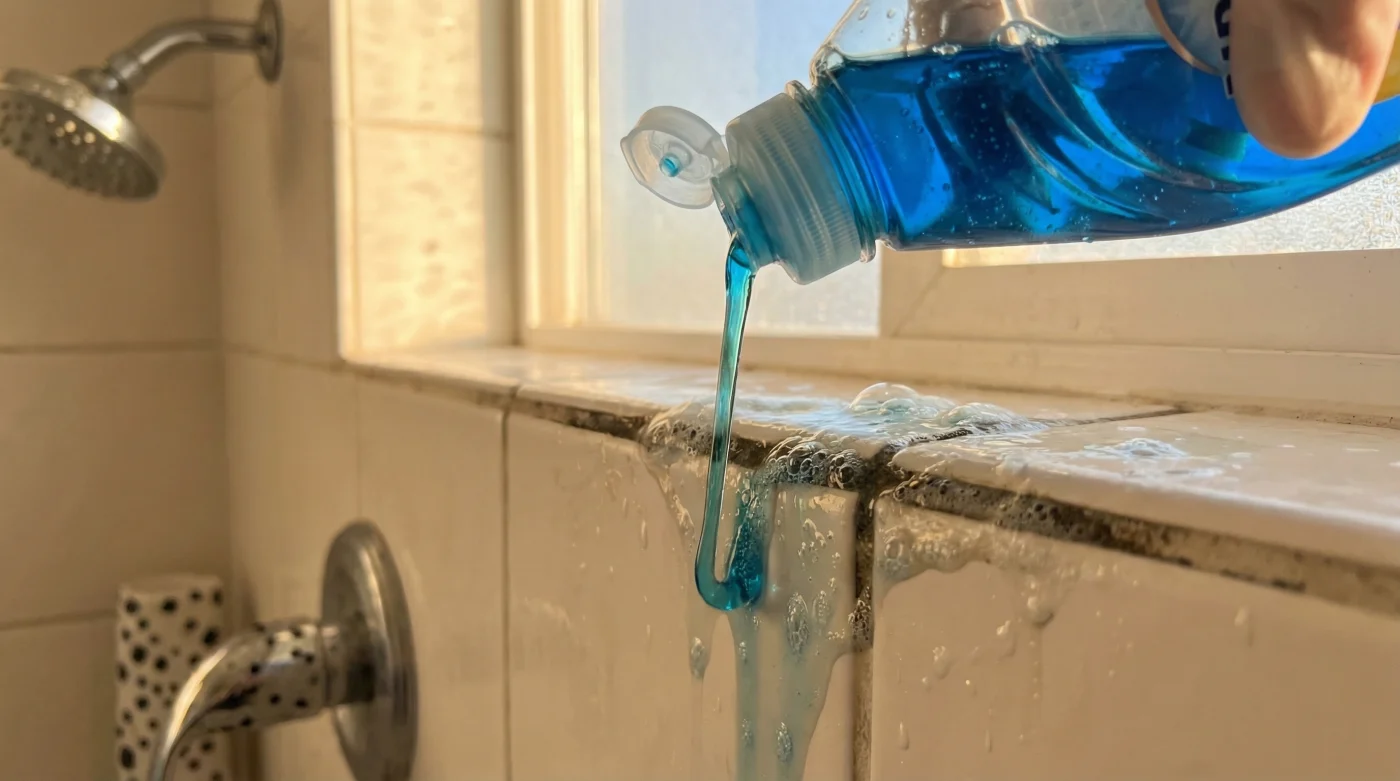
Your shower walls are simply vertical frying pans covered in a slightly different type of fat. Heavy-duty liquid dish soap, specifically the concentrated blue or green liquid sitting next to your kitchen sink, is engineered explicitly for this exact chemical reaction. It contains powerful surfactants that silently melt the lipid barriers of set soap scum without requiring a single scrub from a nylon brush.
A surfactant is a microscopic molecule with a split personality. One end of the molecule loves water, and the other end absolutely despises it, preferring to cling desperately to oils and fats instead. When you apply dish soap to shower grime, these molecules burrow into the soap scum, grab the oils, and pull them apart from the inside out.
The realization that you can completely abandon the toxic fumes of acidic bathroom cleaners is a quiet revelation for anyone who hates cleaning. You are trading a hazardous, lung-burning chore for a calm, deliberate chemical reaction that does all of the heavy lifting while you walk away to enjoy your morning coffee.
Sarah Jenkins, a 42-year-old commercial property manager in Chicago, learned this the hard way. Tasked with maintaining fifty high-end residential units, she was watching her housekeeping budget bleed into harsh chemical sprays that were prematurely eroding the grout and pitting expensive marble stalls. An old-school tile setter caught her aggressively scrubbing a master bathroom one afternoon and shook his head. He handed her a simple squirt bottle filled with warm water and blue dish soap, telling her to coat the walls, lock the door, and go eat lunch. He told her to stop fighting the fat and let the soap eat it. She never bought industrial bathroom bleach again.
Applying this gentle logic to your own home changes the entire rhythm of weekend maintenance. Instead of blocking out a miserable hour of physical labor that leaves your back aching, you are orchestrating a slow breakdown of materials that takes fewer than five minutes of active effort.
Tailoring the Wash to the Wall
Not all showers are built the same, and your approach to the dish soap method should adapt slightly to the materials you are treating. The core mechanism remains the same, but the physical application varies depending on your specific tile type.
If your shower walls are slick, sealed ceramic, you have the easiest path. The grime is entirely surface-level, resting on top of the glaze and pooling into the recessed grout lines. You want a high-viscosity application over slick tiles. Mix the dish soap with just enough water to create a thick, heavy foam that will cling stubbornly to the vertical surfaces without immediately sliding down the drain, allowing the surfactants time to work.
Marble, slate, and travertine are notoriously finicky natural stones. They drink up liquids and react terribly to high acidity, which is why traditional bathroom cleaners often etch and ruin them over time. Dish soap is pH-neutral, making it incredibly safe for delicate stone. However, you need to pre-wet the walls with plain warm water before applying the soap mixture, ensuring the stone pores are full of clean water so the soapy slurry sits purely on the surface grime.
If your soap scum is heavily mixed with chalky white mineral deposits from your municipal water supply, dish soap alone will melt the fat but leave the calcium scale behind. In this specific scenario, a subtle chemical bridge is required. Adding just a few drops of white vinegar to a wet sponge after the initial lipid breakdown will gently dissolve the remaining dry minerals without requiring harsh scrubbing.
The Slow Melt Method
- Dawn Powerwash spray instantly lifts set carpet stains without heavy scrubbing.
- Baking soda paste permanently etches delicate non-stick frying pans during scrubbing.
- Talc-free baby powder sweeps into floorboard cracks silencing squeaky wooden steps.
- Clorox bleach spray permanently yellows white fiberglass bathtubs after three uses.
- Uncooked white rice safely cleans inaccessible narrow glass vases completely overnight.
The temperature of the water is the catalyst that activates the entire process. Cold water causes the fats in the soap scum to contract and harden, actively resisting the soapy surfactants. You need water at 120 degrees to soften the biological concrete and open up the grime to the soap.
- Heat 16 ounces of water until it is very warm to the touch, but not scalding hot.
- Pour the water into your spray bottle, adding exactly two tablespoons of heavy-duty liquid dish soap. Swirl the bottle gently in circles to combine the liquids without creating excess foam inside the plastic chamber.
- Mist the shower walls generously from top to bottom, ensuring the sandy grout lines are heavily saturated. The liquid should coat the grime like a thick morning dew.
- Walk away for exactly 45 minutes. This dwell time is completely non-negotiable; the surfactants need this specific window to dismantle the tight lipid bonds of the soap scum.
- Return with the handheld showerhead or a plastic pitcher of warm water, and simply rinse the walls downward. Use the soft microfiber cloth to gently wipe away the melted slurry that remains.
You will notice immediately that the grout lines have returned to their original, uniform color without a single brush stroke. There is no chemical residue left behind to irritate your feet, just the clean, neutral scent of the soap.
The beautiful byproduct of this method is the absence of physical friction, which means your grout remains structurally sound for decades. Harsh nylon scrubbing slowly chips away at the sandy mortar, creating microscopic valleys where future grime settles even deeper and faster.
Reclaiming Your Peace of Mind
There is a distinct quietness to maintaining a home when you understand how things actually work at a structural level. You stop fighting your environment with blind aggression and start working in tandem with it. The realization that the harshest, most heavily marketed chemical is often the least effective one shifts how you look at every product under your sink.
You are no longer dreading the bathroom deep-clean as a weekend punishment. By replacing a thirty-minute chore of aggressive scrubbing with a two-minute mindful application of basic chemistry, you are buying back your own time. The bathroom feels significantly cleaner because it actually is cleaner, stripped down to its true, bare surface rather than artificially masked by a temporary layer of bleach.
The secret to a beautifully maintained home isn’t found in how hard you scrub, but in understanding exactly what you are trying to wash away.
| Cleaning Agent | Mechanism of Action | Added Value for You |
|---|---|---|
| Bleach Sprays | Bleaches organic color out of the stain; highly acidic. | Creates the illusion of clean, but leaves the physical lipid barrier intact. |
| Liquid Dish Soap | Surfactants physically break lipid bonds; pH neutral. | Actually removes the soap scum barrier safely without toxic fumes or scrubbing. |
| Abrasive Powders | Uses physical friction to scrape away layers of grime. | Slowly destroys the mortar in your grout, creating deeper pockets for future dirt. |
Frequently Asked Questions
Can I use any brand of dish soap for this method?
You need a heavy-duty, concentrated dish soap designed to cut grease. Cheap, diluted brands lack the density of surfactants required to break down hardened bathroom soap scum.
Will dish soap leave my shower floor dangerously slippery?
If left unrinsed, yes. You must thoroughly rinse the walls and floor with warm water after the 45-minute dwell time, using a microfiber cloth to wipe away the broken-down soapy slurry.
How often should I apply the dish soap mixture to my grout?
Once every two weeks is perfectly sufficient to keep the lipid barriers from rebuilding and hardening into permanent soap scum.
Does this method kill mold and mildew in the shower?
Dish soap is designed to lift fats and oils, not to act as a disinfectant. If you have active mold spores, you will need a dedicated peroxide or enzyme treatment after removing the soap scum barrier.
Why do I have to wait 45 minutes before rinsing?
Chemistry takes time. The surfactants need to physically embed themselves into the dense layers of body oil and fatty acids to pry them apart from the tile surface.