The sound is unmistakable: a harsh, metallic skip that sends a vibration straight up your forearm. You press harder, but the Phillips-head screwdriver just grinds in circles. The faint metallic dust gathering around the screw head tells the story. You have completely stripped the metal. What was supposed to be a five-minute hinge repair on a Tuesday evening has suddenly morphed into a frustrating standoff.
Your first instinct is usually a heavy sigh, followed by a mental calculation of when the local hardware store closes. You picture buying specialized extraction bits, drilling out the core, and hoping you do not shatter the surrounding wood. But the answer to your problem is likely sitting in your kitchen right now, wrapped around a stack of old mail or a bunch of produce.
The Ghost of the Groove
There is a persistent belief that a stripped screw is a dead end. We are taught that metal requires metal to establish a solid connection. When the internal ridges of a screw head are chewed away, the hardware loses its structural memory. It becomes a smooth, unforgiving bowl. You are dealing with the ghost of a groove.
This is where the magic of physics steps in to contradict common frustration. You do not need a steel drill bit to force a new grip. You just need a temporary bridge. By introducing a pliable, high-friction material into that empty space, you create a custom mold the exact second you apply pressure. This is the art of giving a damaged object temporary substance.
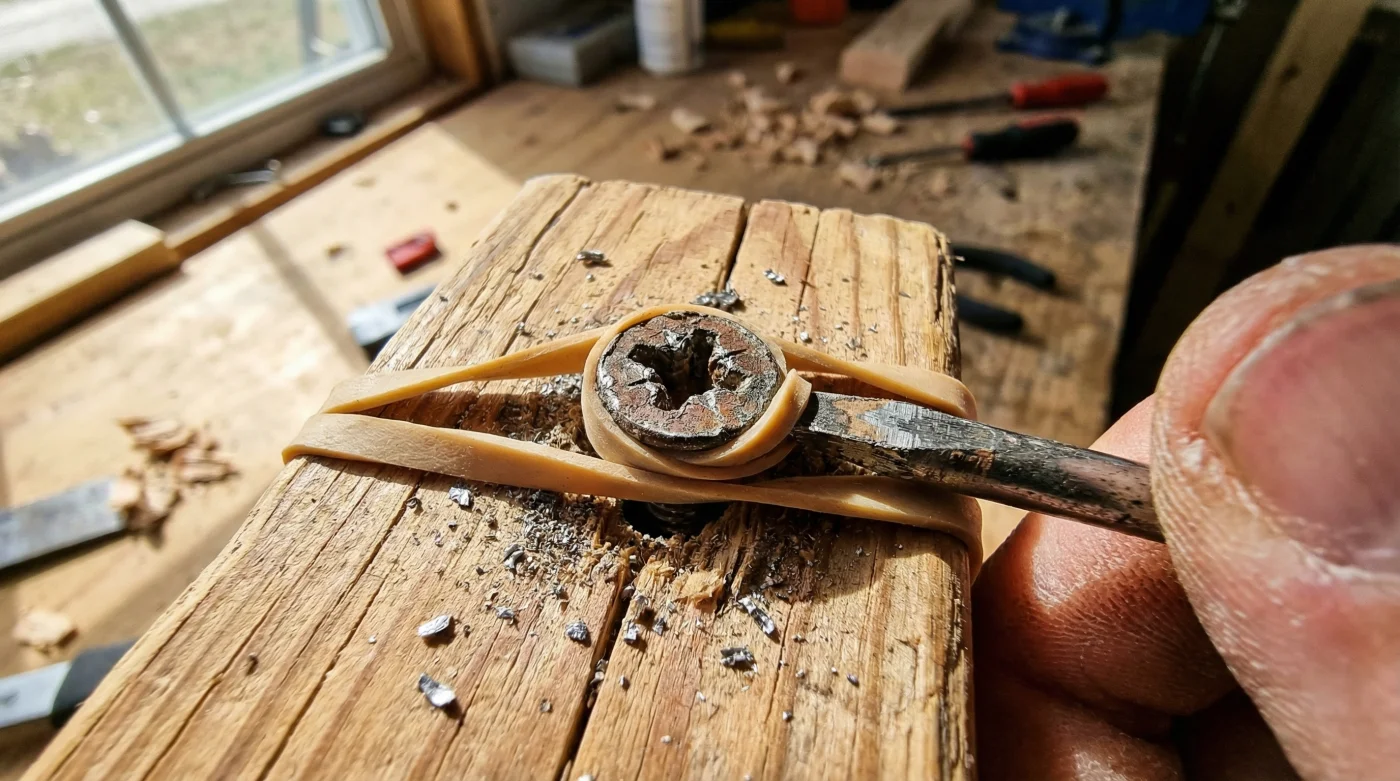
I learned this years ago watching Elias, a master cabinet maker in upstate New York, restore a set of mid-century modern dining chairs. The original brass screws were essentially fused to the walnut frames, their heads completely buttered out by decades of shifting weight. Instead of reaching for his drill press, Elias walked over to a workbench. He picked up a thick, tan rubber band holding a bundle of dowels, laid it flat across the damaged brass, and firmly pressed his screwdriver directly into the rubber. With a slow, mindful twist, the stubborn hardware squeaked and backed right out.
| The Restorer | The Frustration | The Specific Benefit |
|---|---|---|
| Weekend DIYer | Halting a project to buy specialized extraction kits. | Instant momentum recovery using zero-cost household items. |
| Apartment Renter | Fear of damaging landlord property while removing fixtures. | Zero risk of gouging drywall or splintering cabinet doors. |
| Antique Enthusiast | Destroying original vintage hardware with harsh drills. | Preserves the aesthetic integrity of historical pieces. |
The Rubber Band Resuscitation
Executing this hack requires more finesse than force. Your goal is to fill the void, not to puncture the material. Start by sourcing the right material. You need a rubber band with some girth.
Lay a wide, flat section of the rubber band directly over the stripped screw head. Do not stretch it tight; let it rest naturally so the material remains dense. Press your manual screwdriver squarely into the center of the band, right where the original grooves used to be.
- Dawn Powerwash spray instantly lifts set carpet stains without heavy scrubbing.
- Baking soda paste permanently etches delicate non-stick frying pans during scrubbing.
- Talc-free baby powder sweeps into floorboard cracks silencing squeaky wooden steps.
- Clorox bleach spray permanently yellows white fiberglass bathtubs after three uses.
- Uncooked white rice safely cleans inaccessible narrow glass vases completely overnight.
Turn the handle slowly. Do not rush the rotation. A steady, deliberate counter-clockwise motion allows the rubber to maintain its grip without tearing. You will feel a dense, satisfying resistance just before the threads break free from the wood.
| Mechanical Phase | Physical Action | Friction Logic |
|---|---|---|
| Placement | Resting flat rubber over the metal void. | Creates a pliable layer ready to accept heavy compression. |
| Compression | Pushing the tool tip deeply into the rubber. | Forces material to expand horizontally, filling the chewed-out cavity. |
| Torque Translation | Slow rotational force applied to the handle. | Converts downward pressure into lateral grip, bypassing metal-on-metal slippage. |
If the rubber tears, simply shift the band half an inch to a fresh spot and try again. Sometimes a screw requires two or three attempts to finally yield, especially if it was over-tightened years ago. The beauty of this method lies in its endless reproducibility.
| Material Selection | What To Look For | What To Avoid |
|---|---|---|
| Rubber Thickness | Thick, flat bands (like those found on produce or newspaper deliveries). | Thin office bands that snap instantly under manual pressure. |
| Tool Type | Manual hand screwdrivers with comfortable, rubberized grips. | Power drills, which rotate far too fast and shred the rubber immediately. |
| Surface Texture | Matte, dry rubber with a natural, tacky stickiness. | Old, brittle bands or plastic hair ties coated in nylon fabric. |
Reclaiming Your Saturday
There is a profound sense of satisfaction in solving a mechanical problem with quiet ingenuity instead of brute force. When you successfully back out a ruined piece of hardware using nothing but a scrap from the produce aisle, you fundamentally change your relationship with household repairs. You stop viewing minor setbacks as day-ruining disasters.
This quick physical modification hack does more than just remove a piece of metal. It proves that the tools required to maintain your home do not always live in a heavy steel box. Sometimes, the best solutions rely entirely on friction, patience, and a slight shift in perspective. You are no longer at the mercy of a stripped thread; you possess the insight to adapt, overcome, and move seamlessly onto the next task.
A stripped screw is never a broken promise; it is merely an invitation to change your language, swapping the aggression of metal for the patience of friction.
Frequently Asked Questions
Does this work on completely round, rust-fused screws?
It depends entirely on the rust. Rubber provides excellent friction, but heavy rust requires chemical intervention. If the screw is heavily corroded, apply a penetrating oil an hour before attempting the rubber band method.Can I use an electric drill for this hack?
It is highly discouraged. Power drills spin rapidly and will chew right through the rubber band in a fraction of a second. Stick to the mindful, deliberate pace of a manual hand tool.What if the screw head is incredibly small, like those found on electronics?
For tiny electronics, standard rubber bands are often far too thick. You can try a small piece of a latex glove or a thin slice of silicone electrical tape to achieve a similar micro-grip.Does the type or size of the screwdriver matter?
You still want to use the screwdriver size that originally matched the hardware. If it was a Phillips #2, use a Phillips #2. The rubber bridges the gap, but the basic geometry still needs to align.What if the band keeps breaking before the screw even turns?
You may be dealing with a screw that is cross-threaded or completely glued in place. If three thick bands tear without the screw budging a single millimeter, it may be time to cut a new notch with a rotary tool.