You are standing in the driveway on a mild Saturday afternoon, staring at the back of your car. The air smells faintly of freshly cut grass, but your attention is entirely focused on the faded, peeling edges of a bumper sticker you applied five years ago. It feels like a permanent mistake, an eyesore that mocks your attempts to keep the vehicle looking sharp.
You probably reach for the usual suspects: a rigid plastic scraper, a spray bottle of harsh chemical solvents, or worse, a kitchen knife. You prepare for a battle of frustration, anticipating the slow process of chipping away millimeter by millimeter while worrying constantly about gouging the clear coat or scratching the auto glass permanently.
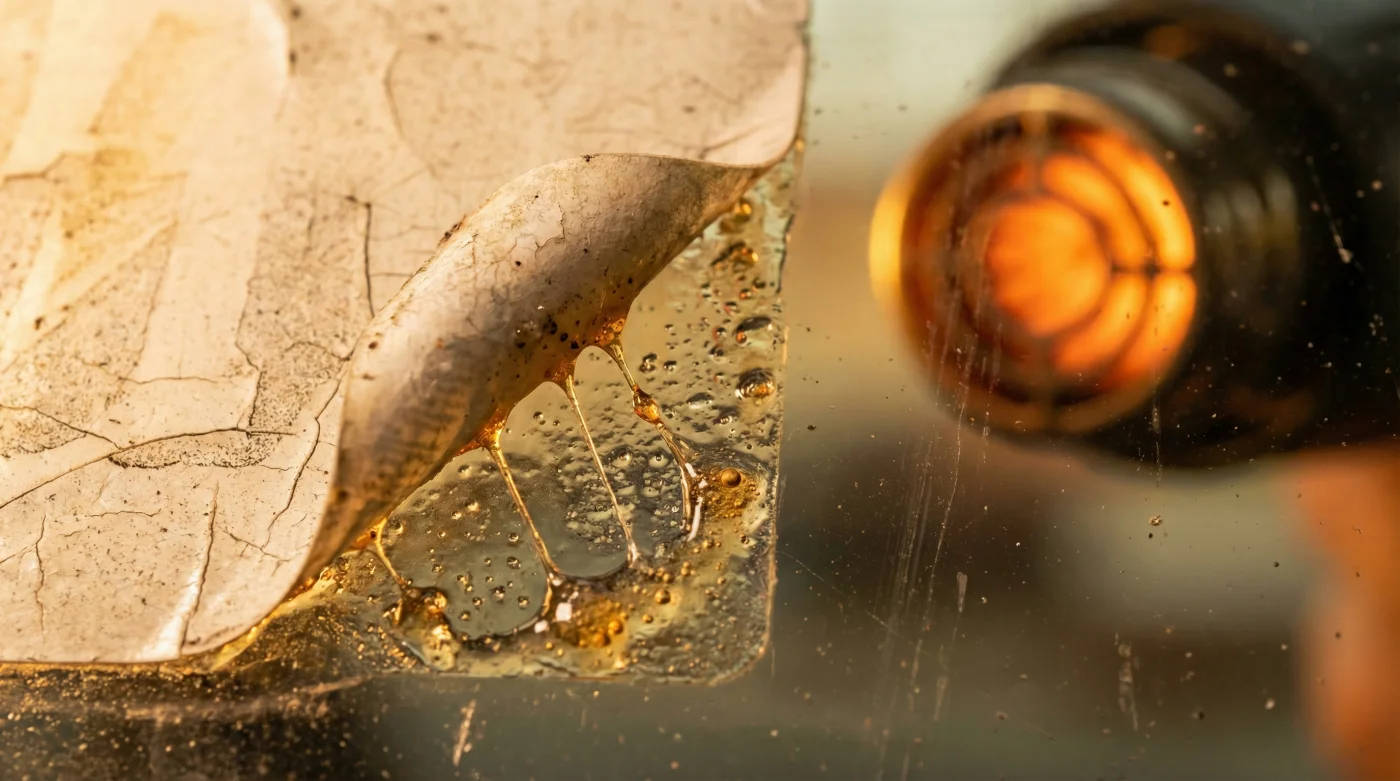
That aggressive scraping is how most people tackle adhesive residue, treating it like a rigid invader that must be scraped off by sheer mechanical force. But the reality in professional auto detailing bays is much quieter and requires absolutely zero brute strength.
Instead of fighting the hardened resin, professionals manipulate its physical state. By understanding how temperature affects chemical bonds, you melt the resistance away entirely, replacing thirty minutes of sweaty labor with ninety seconds of focused thermal application using a tool you already own.
The Chemistry of Letting Go
Think of bumper sticker adhesive like cold butter on toast. If you try to spread it straight from the fridge, it tears the fragile bread beneath it, leaving clumps on the surface and structural damage below. You are fighting the physical state of the material. But if you introduce a little warmth, it glides without friction, spreading smoothly and obediently.
The glue backing on automotive decals is a thermoplastic polymer. When cold or at room temperature, it locks down, curing into a stubborn, crystalline grip against your car. Scraping shatters this grip, leaving behind jagged flakes and sticky smears that require toxic solvents to clear completely.
By introducing targeted thermal heat using nothing more than the standard hair dryer sitting in your bathroom cabinet, you are changing the polymer’s behavior at a molecular level. You reverse its physical state back to a semi-liquid, convincing the resin to release its hold voluntarily. It is a quiet negotiation rather than an abrasive attack.
Marcus Vance, a 42-year-old independent auto restoration specialist in Ohio, has spent two decades preserving vintage car paint. “People bring me cars with spiderweb scratches all over the trunk lid because they attacked a dealer decal with a credit card,” he explains. “I just plug in a standard 1800-watt hair dryer. Heat does the heavy lifting, not your hands. Once the surface feels like a coffee mug left in the sun, you can practically breathe on the sticker and it lifts right off.”
Adapting the Heat for Your Canvas
Not all surfaces react to temperature and scraping the exact same way. Understanding your specific automotive surface dictates how you apply the warmth to ensure zero damage to the underlying materials.
For your auto glass, windows are highly resilient to heat but incredibly unforgiving when it comes to sharp metal scrapers. Glass disperses heat quickly, so keep the nozzle moving constantly in tight, overlapping circles to warm the thermal barrier directly behind the sticker.
For painted bumpers and quarter panels, modern automotive clear coat is durable, engineered to bake in the hot summer sun, but it can warp if localized, artificial heat is held still in a concentrated circle for too long. Keep the hair dryer about six inches away from the surface. You want the paint to feel hot to the touch, around 120 degrees Fahrenheit, but never so hot that it burns your bare skin.
- Dawn Powerwash spray instantly lifts set carpet stains without heavy scrubbing.
- Baking soda paste permanently etches delicate non-stick frying pans during scrubbing.
- Talc-free baby powder sweeps into floorboard cracks silencing squeaky wooden steps.
- Clorox bleach spray permanently yellows white fiberglass bathtubs after three uses.
- Uncooked white rice safely cleans inaccessible narrow glass vases completely overnight.
The Mindful Application Toolkit
Stripping away that old resin is a deliberate, mindful process. Gather your materials before you begin this quiet task: a standard multi-setting hair dryer, a heavy-duty extension cord, a clean microfiber towel, and a soft plastic wedge. An old hotel room key or loyalty card works perfectly for this.
Follow these precise, minimalist actions to ensure the resin releases without leaving a trace behind. Patience is your primary tool when dealing with old, sun-baked adhesives that have bonded to your car for years.
- Clean the perimeter: Wipe away microscopic surface dirt and road grime around the decal so your plastic wedge doesn’t drag abrasive grit across the delicate paint.
- Prime the temperature: Set the hair dryer to your highest heat setting and lowest fan speed. This ensures maximum thermal transfer to the sticker without blowing unnecessary dust around your workspace.
- Hover and sweep: Hold the dryer nozzle exactly three to five inches away, moving in continuous, rhythmic figure-eight patterns over one distinct edge of the sticker for exactly sixty to ninety seconds.
- Test the release: Gently pry the warmed corner with the edge of your plastic wedge. If the material bends fluidly rather than snapping abruptly, the adhesive is liquid enough to proceed with the peel.
- Pull parallel: Instead of pulling the sticker straight up toward your chest—which creates severe vertical tension—pull it back against itself at a sharp 180-degree angle while maintaining the warm airflow.
If you encounter resistance mid-pull, stop immediately. Do not force the peel, or you risk tearing the decal and leaving fresh clumps of resin behind. Apply another fifteen seconds of heat to that specific quadrant until the tension relaxes naturally.
Reclaiming Your Weekend and Peace of Mind
There is a distinct satisfaction in removing something completely, leaving no ghost of its existence behind. Mastering this simple thermal technique changes the way you approach maintenance and minor frustrations around your home and garage.
You no longer look at stubborn problems as walls that need to be knocked down by force. You look for the leverage to shift the paradigm. By understanding how a material behaves under pressure and temperature, you solve the root cause rather than merely fighting the outward symptoms.
A clean bumper or a pristine back window is a small detail, but it resets the visual weight of your vehicle. It is a quiet victory over the stubborn clutter of the past, achieved not with harsh chemicals or scratched glass, but with simple, intelligent warmth.
“When you stop fighting the adhesive and start communicating with it through applied warmth, the glass and paint naturally protect themselves.” — Marcus Vance
| Key Point | Detail | Added Value for the Reader |
|---|---|---|
| Chemical Solvents | Requires heavy scrubbing and leaves toxic fumes. | You avoid breathing harsh vapors and protect your skin. |
| Razor Scraping | High risk of permanent gouges on auto glass. | You save hundreds of dollars in windshield repair costs. |
| Thermal Heat | Effortless peel using everyday household items. | You preserve the factory clear coat with zero extra spending. |
Frequently Asked Questions
Will a hair dryer melt my car’s clear coat? No, standard hair dryers reach about 140 degrees Fahrenheit, which is well below the melting point of automotive paint, provided you keep the nozzle moving rhythmically.
How long should I apply the heat? Usually sixty to ninety seconds of continuous, sweeping heat is enough to liquefy the adhesive resin without overheating the surrounding surface.
What if a sticky residue is still left behind? Reheat the leftover resin gently for fifteen seconds, then immediately wipe it away with a clean microfiber towel.
Can I use a heat gun instead of a hair dryer? You can, but you must be extremely cautious. Heat guns burn much hotter and can blister paint or warp plastic trim in mere seconds.
Does this work on auto glass window decals? Absolutely. Auto glass handles heat exceptionally well, making thermal application the safest possible way to remove old window stickers without scratching.