Standing at the kitchen sink, the water running cold over your hands, you hear the unmistakable scrape of a sponge against your favorite frying pan. The smell of lingering dish soap mixes with the faint, stubborn odor of old grease. You stare at the burnt-on residue from a simple weeknight dinner, feeling that familiar knot of frustration. A pan that cost a small fortune is now stubbornly clinging to the remnants of scrambled eggs and seared vegetables.
Most people reach for the white box in the pantry without a second thought, shaking a generous mound of powder directly onto the metal and mixing it with a careless splash of tap water until it looks like thick frosting.
It feels deeply productive in the moment. The heavy grit under your sponge feels like it is actively working to lift the burnt-on mess, providing a tactile reassurance that the pan is finally getting clean after a long day. You lean into the sponge, letting the friction do the heavy lifting, washing away the stubborn brown marks and feeling a fleeting sense of victory over the kitchen mess.
But that satisfying friction is quietly destroying the very tool you are trying to preserve. You don’t need a tougher scrubber; you need a smarter ratio to save your cookware. The secret lies in treating your daily cleaner less like a sheet of coarse sandpaper and more like a gentle exfoliating serum designed to protect a fragile barrier.
Rethinking the Friction Equation
We are conditioned from an early age to believe that tough stains require sheer brute force. We think of cleaning as an act of erosion, scrubbing and scraping until the offensive material simply wears away and vanishes down the drain.
Think of your non-stick skillet like the delicate paint job on vintage sports cars. You would never dream of grabbing a handful of loose gravel to wash a classic exterior, yet that is exactly the kind of microscopic violence happening in your sink every evening.
Baking soda is, at its core, a jagged crystalline salt designed by nature to be resilient. When packed densely into a thick paste with very little moisture, those tiny, sharp crystals drag brutally across smooth surfaces like microscopic razor blades. They create invisible micro-fissures in the coating that you cannot see with the naked eye. Day by day, week by week, the non-stick surface loses its integrity, causing your morning eggs to stick and leaving the pan ultimately ruined. By adjusting the moisture balance, you force the crystals to dissolve slightly, turning a harsh abrasive into a soft, alkaline buffer that cleans without causing harm.
Clara Jenkins, a forty-two-year-old culinary instructor from Chicago, discovered the perfect resting time after unknowingly destroying a three-hundred-dollar copper-core crepe pan in her own home. Devastated by the loss of her favorite tool, she spent an entire afternoon experimenting with a digital scale and varying water temperatures. She found that warm water, applied with patience, forced the sodium bicarbonate to soften beautifully. Her wet-sand technique is now the very first lesson she teaches her nervous kitchen aides on their first day.
Adjustment Layers for Your Kitchen Roster
Not all delicate surfaces demand the exact same touch, and treating every pan as identical is a recipe for expensive mistakes. You need to assess the specific material on the counter before you even begin to mix your compound.
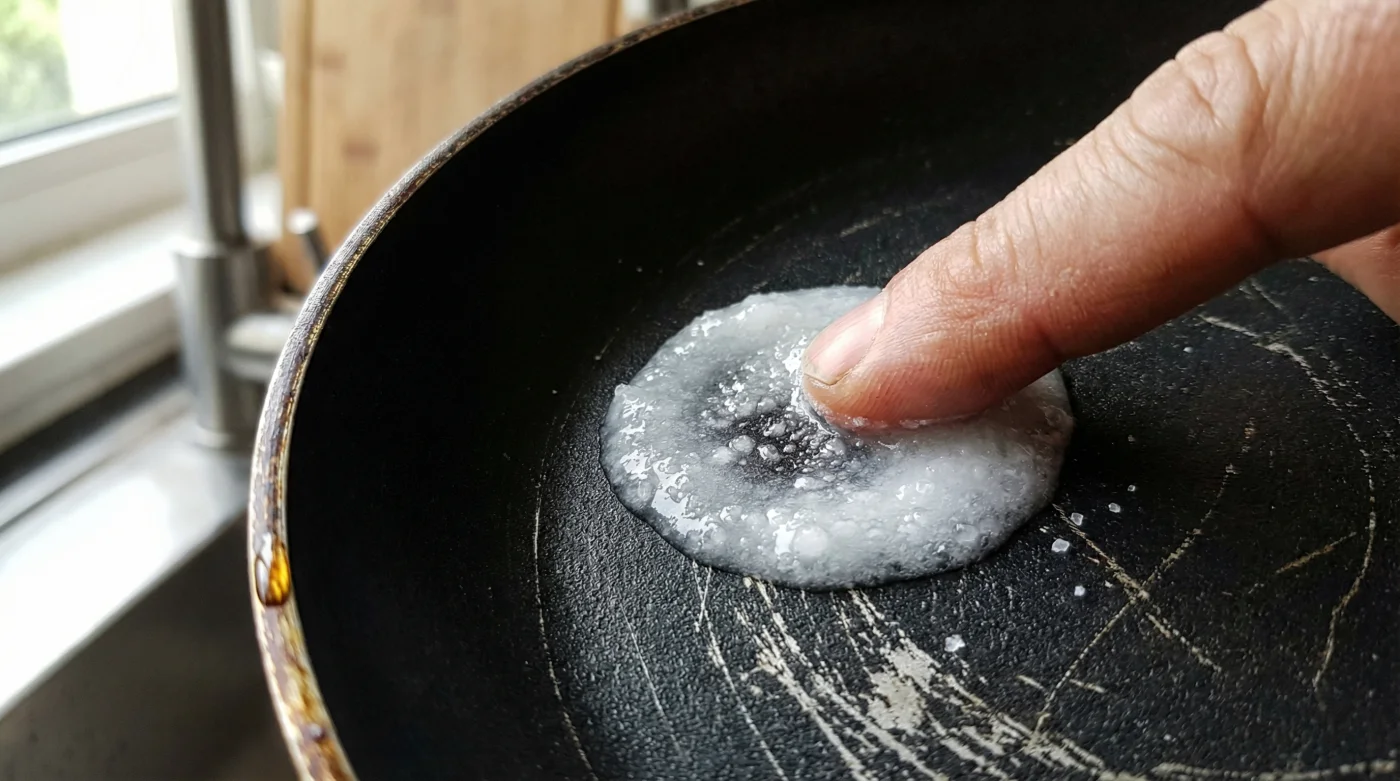
For the sensitive non-stick purist, you must read the material before mixing the solution. These highly sensitive surfaces absolutely cannot handle any form of dry friction. To protect the coating, mix three parts very warm water to one part powder in a separate glass bowl.
Let the mixture sit untouched for two full minutes until the rough edges of the powder turn slightly translucent in the water. The final consistency should feel exactly like heavy cream, softly buffering the pan like breathing through a pillow, rather than scraping the metal raw. This waiting period is crucial, as rushing the application means the salts have not had adequate time to lose their sharp, destructive edges.
- Dawn Powerwash spray instantly lifts set carpet stains without heavy scrubbing.
- Baking soda paste permanently etches delicate non-stick frying pans during scrubbing.
- Talc-free baby powder sweeps into floorboard cracks silencing squeaky wooden steps.
- Clorox bleach spray permanently yellows white fiberglass bathtubs after three uses.
- Uncooked white rice safely cleans inaccessible narrow glass vases completely overnight.
For the polished stainless devotee, dealing with cloudy water spots and rainbow-colored heat rings is a constant, frustrating battle after searing meats on the stove.
A simple one-to-one ratio works perfectly here, provided you wipe strictly with the grain using a soft microfiber cloth instead of a kitchen sponge. The metal can handle slightly less water, but the directional wiping prevents circular micro-abrasions from dulling the mirror finish.
The Wet-Sand Technique
Applying this modified mixture is a quiet, deliberate process that requires a complete shift in your kitchen mindset. You are no longer scrubbing a dirty surface; you are simply allowing the natural chemistry of the alkaline mixture to break down the acidic food bonds.
Gather your materials before you start, persuading the grease to release without ever applying downward force from your shoulders. You want everything within easy arm’s reach so the delicate paste does not prematurely dry out while you work.
- Measure exactly one tablespoon of the powder into a small glass bowl.
- Add warm tap water gradually, aiming for a temperature around one hundred and five degrees Fahrenheit.
- Stir the mixture gently with a flexible silicone spatula until the grit suspends evenly in the liquid.
- Apply the softened mixture to the cool pan and let it rest undisturbed for exactly five minutes.
- Wipe the surface away with a damp, soft cellulose sponge, using only the weight of your hand.
Your tactical toolkit only requires a digital scale for precision, a silicone spatula, non-scratch cellulose sponges, and water heated to just above body temperature to activate the crucial softening process without shocking the metal.
Preserving What Matters
Taking five extra minutes to dilute your pantry staple properly changes how you interact with the tools that feed your family, completely shifting your daily kitchen mechanics.
You move away from the rush of just getting the chores done and step into a space of mindful maintenance. You stop seeing a dirty pan as an adversary and start treating it as an investment you intend to keep for decades. When you respect the materials in your kitchen, they perform beautifully in return, never letting you down when you need them most.
It is a small, almost invisible shift in your evening routine, but it ripples outward into every meal you cook, ensuring your pans last for years to come. Your food releases perfectly onto the plate, and the frantic, noisy energy of evening cleanup finally slows down into a practiced, predictable, and peaceful rhythm.
“Treat your kitchen tools with the same gentle precision you use to season your food, and they will feed you for a lifetime.” — Clara Jenkins
| Key Point | Detail | Added Value for the Reader |
|---|---|---|
| Teflon Dilution | 3:1 water-to-powder ratio, rested for two minutes. | Prevents irreversible micro-scratches on expensive non-stick coatings. |
| Enamel Lubrication | 2:1 ratio mixed with three drops of mild dish soap. | Removes brown scorch marks without dulling the glass-like factory finish. |
| Stainless Steel Alignment | 1:1 ratio applied strictly with the grain of the metal. | Erases stubborn heat rings while maintaining a flawless mirror shine. |
Frequently Asked Questions
Can I use cold tap water for the mixture?
Cold water prevents the crystalline salts from softening. Always use warm water around one hundred and five degrees Fahrenheit to ensure the grit breaks down properly before application.How long should the paste sit on a stained pan?
Allow the softened mixture to rest on the cool surface for exactly five minutes. This gives the alkaline properties adequate time to break down acidic food bonds without drying out.Is it safe to use a standard green sponge?
No, standard green scouring pads are far too abrasive. Always opt for a soft cellulose sponge or a microfiber cloth to prevent accidental surface damage.What if the scorch marks are deeply burned into the metal?
Repeat the wet-sand process twice rather than increasing the powder ratio or applying downward pressure. Patience protects the coating far better than heavy friction.Can this method salvage an already scratched pan?
While it cannot fill in existing scratches, switching to this gentle dilution method will prevent further degradation and significantly extend the remaining life of the pan.